Thursday, October 31, 2013

31 Days of Halloween - Day 31 - HAPPY HALLOWEEN!!!

Smeared & Smudged
31 Days of Halloween
Day #31
 
Happy Halloween!!!!
 
I wanted to finish this month long
Haunted Halloween Blog Hop with a bang
so I decided to make my very own
Halloween Apothecary / Haunted House...

 
I used a few stamps from Alpha Stamps Poison set to add some fun labels in the background....
Everything else is just things I found here and there...

 
The Maiden's Hair is really mine...I just gave myself a haircut a few days ago and saved it just for this :)


Be sure to stop over at Altered Pages to check out my Box of Bones....

 
Hope you've all had a wonderful time this month...
I sure have enjoyed bringing you a wide range of stamped
Halloween projects!
 
HAPPY HALLOWEEN EVERYONE!!!!!
 

Wednesday, October 30, 2013

October Club Scrap - Lock & Key Blog Hop

October's Club Scrap
 
 Blog Hop!
 
(Note - If you're looking for the Smeared & Smudged 31 Days of Halloween project, please scroll to the next post.)

Well I have to admit that this months collection had me a bit stumped.....


Beautiful isn't it?
Well the reason I was stumped is because I loved it sooooo much!
I was afraid to start a project and then later on decide that it just wasn't worthy of such great paper.  So I thought and thought and thought.... 
Finally I really looked at the stamps and low and behold a spark of an idea came to mind....   

 
You can't really read it from the photo but one of the lines along the edge of the collage stamp in the upper L hand corner says,
"'Tis in my memory lock'd, And you yourself shall keep the key of it." 
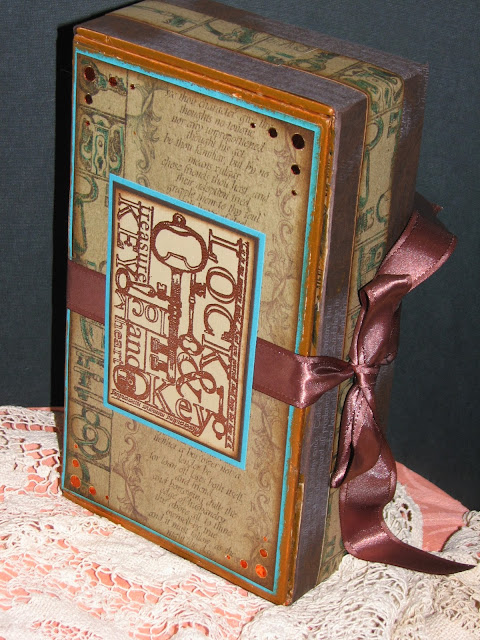
It got me to thinking of ways to keep memories locked away for safe keeping.  Yes, a scrapbook would work but I wanted something a bit more unusual so as I was cleaning and putting things away recently I came upon a cigar box and my project was born!
 
Keepsake Memory Box
 
Everything was from the kit with the exception of the cigar box (of course), the ribbon embossing ink, copper EP and a bit of metallic bronze acrylic paint.  I also used a Spectrum Noir marker to add a bit of turquoise blue highlights to the strip along the side.  I am just so pleased with how it turned out and it was such fun to make!  It's just waiting to be filled with memories!

 
And a few more views....


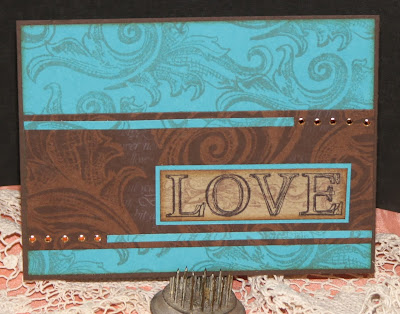
I used up the bits and pieces left over from making the memory box to create several cards....
You know, I had SO much fun using the sheet of copper jewel stickers.  When I first saw them in the kit I thought, gosh those will be tedious to use....the smalls are REALLY tiny.  Instead, I added the 3 tiny ones to the upper corner of this card and I found it was pretty fun so I kept going...
 
 
and going....
 
 
and going...
I know this is going to sound odd but they are really quite relaxing to use.
It's sort of a zone out, Zen kind of thing - LOL!!

 
These nifty star burst sequins & mini brads are also included in the kit.
 
 
Anyway, I hope all of the fun I had playing with this kit is somehow translated into the finished cards and memory keepsake box.

 
The next stop on the hop is
 
 
If you get lost along the way, be sure to check out the
 Club Scrap Blog for the complete list of hoppers.
 
Have a wonderful day!


31 Days of Halloween - #30 - Sexy Witch

Smeared & Smudged
31 Days of Halloween
Day #30
Sexy....
Today I wanted to bring a little sexy into Halloween with this witch in the moon silhouette....

Stamp Credits: Third Coast Rubber Stamps

The witch was actually stamped on a glittery specialty paper then embossed to really make her pop.  I fussy cut her out and added her to the card that I had previously colored with distress stains.  The pumpkin was stamped & embossed  then colored with Distress Markers and Stickles added for a bit of bling.

The tombstones and grass were stamped with Pumice Distress Ink to give the ghostly impression.  I thought the ground needed a bit more so a few swishes with my gelatos did the trick.

Only one day left of Happy Haunting Halloween Fun...

Tuesday, October 29, 2013

31 Days of Halloween - #29 - Stencil me this...

Smeared & Smudged
31 Days of Halloween
Day #29
 
Stencil me this...

One of my favorite rubber stamping techniques is to stamp over the old style stencils.  Yes, there are lots of nifty new patterned stencils on the market but I'm not talking about those.  You know the ones I'm talking about - the cheap chipboard stencils with big wide open areas.  They are perfect for this next technique....

 
I temporarily taped a pumpkin stencil onto a white sheet of cardstock; stamped all over the inside then used a variety of Distress Inks and my Ink Blending Tool to color the image.  Once it was dry I placed the "jack-o-lantern" stencil over the pumpkin and colored in the eyes, nose and mouth.
Finally I cut it out and layered it onto this card.
It's a fun and easy way to make a super looking image for any occasion.
 
A closer look at the pumpkin....

Stamp Credits: Stampers Anonymous

Be sure to check out my other post over at Altered Pages - One Bite...
Remember, you shouldn't always believe a guy in a black cape ;)

 
Have a Haunting Day!

Monday, October 28, 2013

31 Days of Halloween - #28 - a bit Macabre

Smeared & Smudged
31 Days of Halloween
Day #28
A bit Macabre....
o.k...
more than a bit
how about down right scary!
Warning...
this is a bit gory...
I've wanted to use this image from Altered Pages for a while now
and this seemed like the perfect setting...
The girl is from the Frightful Images sheet and the haunted house in the background is from Rafters and cellars and attics OH MY sheet.  I used a few stamps from the Alpha Stamps Poison for the background and the skeletal hand holding the poison bottle.  The reliquary is from Paper Whimsy (they have loads of cool ones to choose from!) and the cross is a Leaky Shed Studio also from Altered Pages.
The blood is actually a mix of Crystal Lacquer and Distress Stain...
looks pretty cool huh? 


Now don't forget to check out the rest of the Smeared & Smudged Halloween Hoppers listed on the right side of the blog for more Halloween fun!

Sunday, October 27, 2013

31 Days of Halloween - Day 27 - Happy Birthday to ME Give-A-Way

Smeared & Smudged
31 Days of Halloween
Day #27

Happy Birthday to ME!!!
 
Yes, today is my b-day
and
I'm not ashamed to admit that I'm 46 years old :)
Age is only a number...
It's how old you feel inside that matters.
 
Today I made myself a birthday card
with a cupcake on top!

 
Stamp Credits: All are from Just For Fun Rubber Stamps.

 
And be sure to check out my post over at Altered Pages - Celebrate!
Here's a peek at my card over there...

 
And now time for my Birthday Give-A-Way...
No, I'm not giving my birthday away but I am giving away 4 different sets of goodies...
The first three sets has a stamp, a couple sets of brads and a sticker/glitter embellishment set.
The forth goodie has a fun Halloween Embellishment set and some way cool brads with various Halloween sentiments spelled out.


To be entered to win one of these sets of goodies,
Post what your favorite part of Halloween ~ it could be the candy, the spooky goodness, the costumes, parties, etc.
 
My favorite part of Halloween is the spooky goodness...
it's the only time of year when it's fun to have the pants scared off of you.
I could watch a spooky movie any other time of year but it just wouldn't be the same - LOL!!
 
You have until 11-1 to post your comment for your chance to win!
 
Good Luck Everyone!!

Saturday, October 26, 2013

31 Days of Halloween - #26 + Leslie's Steampunk Halloween!

Smeared & Smudged
31 Days of Halloween
Day #26
 
and
 
today is also
 
Leslie's Steampunk Halloween Blog Hop!!!
 
I am so excited...
I can't think of two themes I like more but combined it's heaven!
 
So, here is my Steampunk Halloween creation....
I have been so excited about this I could hardly wait to share it with you.
I had soooo much fun making this mask ~ I hope you like!
 
Stamp Credits: Damask background stamp - Deep Red Rubber Stamps - Stampers Best
 
This mask started off as one of those plastic masks with the rubber string to hold it on.  Well, I stamped some tissue paper with the damask background stamp then painted the tissue paper with the bronze Distress Paint.  After it was dry I decoupage it to the mask.  I left it to dry overnight.
 
Once it was dry the fun part began.  I added the tinted Dresden Trim around the edge then added the glittery bat trim and Cinnamon Stickles around the eyes.  While that layer was drying I made several copper rosettes (it's plain white copy paper I painted with the bronze paint.).  I also painted several chipboard gears from Leaky Shed with Distress Paints in various colors.
 
After the mask had dried I began adding the rosettes; gears and glittery bits to the mask in addition to the feathers and Steampunk charms.  Finally I added some Halloween fibers and the stick which is actually two Halloween sucker sticks glued together.
 
It took a while but I LOVE how it turned out.
Here are more pics from various angles.....


Now all I need is my copper corset and flower black lace skirt and I'm ready for the
Steampunk Halloween Ball!
 
Be sure to check out the rest of the Steampunk Halloween bloggers (listed below) and the Smeared & Smudged 31 Days of Halloween participants (listed at the top of the right hand column).


Hope you have a Steamy Halloween!!!

Friday, October 25, 2013

Hoarders video revisited

If you're looking for Day 25 Smeared & Smudged 31 Days of Halloween scroll down to the next post.
 
O.k... This is just too funny and I can so totally relate.
I do use my goodies but I do loooove to go shoppin'!


31 Days of Halloween - #25 - Hoot!

Smeared & Smudged
31 Days of Halloween
Day #25
Hoot Hoot!

Today I wanted to share a triomino charm I made....
Triominoes are three sided dominoes and they are perfect for making charms but they are so hard to find.  I was tickled when I found a box...I instantly knew I wanted to put two together to make a nifty diamond shaped charm and it worked perfectly!


I slid the triominoes together, stamped the image then colored him.  Once it was dry I glued three bead spacers onto one of the pieces then glued the second game piece to the spacers. 
I finally added a bail to the back.

Be sure to check out all the other inspiring Halloween goodness by hopping around the various blogs listed in the right hand column on the blog.

TTFN!

Thursday, October 24, 2013

31 Days of Halloween - #24 - Trick or Treat!

Smeared & Smudged
31 Days of Halloween
Day #24
 
Trick or Treat!


The moon was created using Distress Paints - a combo of 3 different colors then I inked around the moon with various shades of Distress Inks and my Ink Blending Tool.  I then added Stickles glitter glue to the moon.
 
All of the stamps are by Stampers Anonymous


A closer look at the stickled moon...
 
Have a lovely day friends!

Wednesday, October 23, 2013

31 Days of Halloween - #23 - Bits of Halloween

Smeared & Smudged
31 Days of Halloween
Day #23
 
Bits of Halloween

I have lots of bits and pieces of Halloween paper that I wanted to use up so I cut the bits into 1.5" squares and stamped "bits" of images onto each square.  I arranged them on my card; glued them down then added stickles to each.  You know a ghoul can never have too much glitter ;)

Stamp Credits: Spider - Alpha Stamps; remainder - Stampers Anonymous

 
and be sure to check out my post over at Altered Pages...

 
Remember, the scavenger hunt is still going on. 
Check out Terra's blog for the clue and go in search of!
Good Luck
and
Happy Haunting!

Tuesday, October 22, 2013

31 Days of Halloween - #22 - Define Raven

Smeared & Smudged
31 Days of Halloween
Day #22
 
Define Raven
The official bird of Halloween...
or if it isn't, it should be!


I stamped the image on white cardstock and embossed with black ep.  The sentiment was stamped with white Distress Stain and then I flicked the stain onto the black piece of cardstock.  I then went back over each droplet and added a touch of Stickles Glitter Glue.
 
I found this awesome picture & definition of raven in one of my old dictionaries so I tore it out and added it to the card ~ then layered the stamped image over the definition.

 
Have a frightening day!

Monday, October 21, 2013

Book & Paint Winners!!!

 
I thought I had posted the winners of the book earlier but as it turns out it was just a saved draft so without further delay...
The Winners of the Laura Childs - Gilt Trip books are.....
 
Diane
 
Diane said...
I to follow Laura, I usually make cards if I'm not scrapbooking. I really like your shadow box, they are such fun to make but I don't know what to do with them after. I don't have much room in my little house.
Now that we have a new vintage store in our city...The Pape Collage in AZ, I have been having fun with vintage projects. Making ATC cards and HOLDers and trading with other friends. ALso an ART Journal Book is hwere I keep my samples of tags and ATC cards .I'd love to win the book.
You come up with the most stunning ideas and those colours on the puzzle piece are just delicious.

My favourite candy for Halloween is the Cadbury's Scream Egg which is a Creme Egg with a Halloween makeover.

31 Days of Halloween - #21 - A Candy Cone

Smeared & Smudged
31 Days of Halloween
Day 21
 
A Candy Cone just for you!

 
This cone started off life holding the thin yarn used to make pot holders...  a friend of mine knits (or crochets) them to sell at the town wide garage sale every year so she ends up with loads of these wicked cones.  They are PERFECT for making gift/treat cones so she saves them for me :)


I started off by painting the cone with Distress Paints then I sprinkled the whole thing with Rock Candy Glitter (mmmm love that stuff!).  I stamped the sentiment (Tim Holtz Stampers Anonymous)on white cardstock then crinkled, inked and stickled it till it looked just like I wanted it to.
 
The little girl and pumpkins are from various Altered Pages collage sheets.  I free-hand cut her witch hat and added a band of stickles glitter glue.  I then added a faux crystal swag hanging from the bottom, some mercury silver garland paired with the ball trim around the edge of the cone and finally a tinsel pipe cleaner for the handle.


Fun Fun Fun!
 
Remember to check Terra's blog each day for the new hint in the Scavenger Hunt as there are loads of prizes to be won and if you have time check out some of the other Halloween crazies for more Halloween fun.  The list in the upper right hand corner of the blog has direct links to each artists blog.