Thursday, September 29, 2016

Hand Made Dictionary Beads!

Today I have a project that I'm sure you may have seen before but I like to think that I've kicked it up a notch....  paper beads!


These are a bit different that the usual beads...instead of using magazine pages or cardstock/pattern paper I used dictionary pages and for a bit more of a professional look I glued eyelets into each end and covered them with a couple layers of clear embossing powder.  They look like glass beads IRL.

For complete instructions please see:


on the Imagine Blog.

Wednesday, September 28, 2016

Garden Shed Blog Hop

Welcome, welcome!!  Another month coming to a close which means it's time for another fun Club Scrap Blog Hop!  This month's kit - Garden Shed has been fun to play with - the colors, stamps and lovely papers have truly inspired me.  I wanted to play with the "soft" side of this kit - when I say soft side for some reason these papers just look dreamy to me so I wanted to make something a little elegant and pretty.

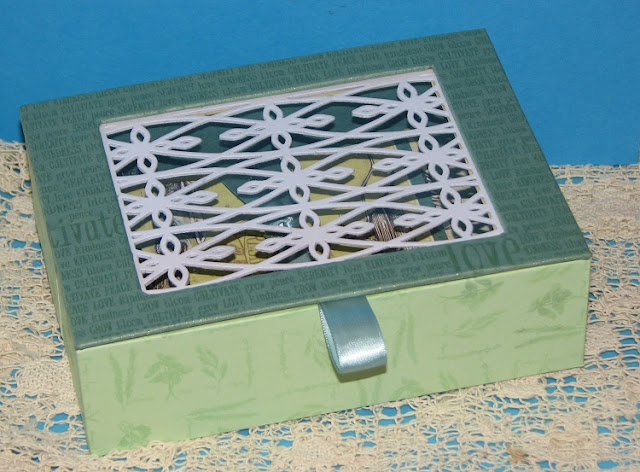
Recently I bought a few new die-cuts from Spellbinders and had the perfect idea to play off of the Garden Shed theme...  what do you find in many gardens???  Gates of course so I created this keepsake box with a see through garden gate top....  well, the design looks like a garden gate to me anyway ;)


The box was created using book board scraps from Club Scrap then covered with a variety of papers.


I even decorated the inside of the box with one of the fun garden themed prints.


And then I filled it with cards that I made using the Cut-Aparts from the kit as well as salvaged scraps from all of the projects and cards I made earlier in the month.  A fun way to put those scraps to use!


The card above and below were made as a pair using inlaid die-cuts as "windows" into the garden.  The tree images out in the garden are actually digital images from the Garden Shed Digital kit!  The first time I've used a digital scrapbook kit :)  Actually CS makes it easy - you can just copy, paste and resize it to any size you like.  You know it's got to be easy if I can do it - LOL!!

I left the cards very clean and simple because I thought the teal was lovely with the stark white of the cardstock.  The images behind were printed then I water colored each image differently.  The top panel with the inlaid die-cut was then mounted onto the card base with double stick foam tape to pop it off the background to give the illusion that you were actually looking out into the garden.


The upper portion of this card was stenciled with New Sprout Memento Ink and the stencil that came with the kit.


To make the box I assembled a plain box with book board.  It was later covered with various cardstock pieces inside and out.


I cut 4 layers of the same die-cut from cardstock and glued them all together.


I then cut the appropriate sized hole from the box lid, papered, added a piece of acetate and then the stacked die-cuts.  Once I had attached the lid to the box I added a piece of cardstock with a window cut-out to hide all of the layers on the inside of the lid.

Hope you have enjoyed my stop on the hop today!

Your next stop on the hop is...


If you get lost along the way you can find the complete list of participants here...


Supplies:

ClubScrap.com - Garden Shed Cardstock, Cut-Aparts, Fibers/Ribbon, Buttons, Stamps, Stencil; Book Board; Book Binding Glue
Spellbinders - Die
Imagine - Memento Dye Ink; VersaColor; Sponge Dauber

Friday, September 23, 2016

Garden Shed Artist Team Challenge

Welcome to the Club Scrap Artist Team Challenge.... This month in keeping with the Garden Shed kit the Club Scrap Artist Team was challenged to use some sort of wood embellishment in their creations.  It could be some element actually made of wood, a wood grain stamp or embossing folder, wood grain paper, etc.

Well I gave it some thought and was so inspired by the kit theme that I went ahead and made a Garden Shed Journal and holder....


I made the "holder" from book board glued together with CS Book Binding Glue.  I then painted it with green paint and added all sorts of foliage and flowers.  I had a length of picket fence that I aged with a touch of white acrylic paint and chocolate brown glaze from Deco Art.  The little welcome mat is actually a wood label from the kit that I painted and free-hand wrote welcome.


The album covers are chipboard from the pizza box the kits come it and some of the papers from the kit.  I used popsicle sticks to make the door which I also glazed with the same DecoArt medium.  The dark brown pieces on the door and roof are actually a fun foam that I heated with my heat tool and put tiny striations in to mimic wood grain.

(sorry for the blurry pic)

Here is a picture of the door open...you could put any sentiment you like behind the door.  I used a small velcro circle to hold it shut.


Inside I used some of the pattern and plain cardstock from the kit as dividers - in between the dividers are sheets of watercolor and mixed media papers to alter/decorate as desired.


And there you have it...my garden shed journal made from the Garden Shed kit!
Hope you enjoyed this bit of inspiration.

Your next stop on the hop is


If you get lost along the way you can find the complete list of inspiring links here:


Have a lovely day my inky friends!

Thursday, September 22, 2016

Happy Fall!!!

This is my favorite time of the year....
cool crisp mornings, crunchy leaves underfoot, yummy soups and stews, 
I can hardly wait!

Here's to falling leaves...


Beautiful sunsets...


a riot of color


spooky fun


and a bountiful harvest!!


Happy Autumn Everyone!!!

What's your favorite season and why???

Supplies:

JFF Stamps - All images
Imagine - Memento Dye Inks, VersaMark ink, Embossing Powders, Sponge Daubers, Memento Dual Tip Markers
Other: Colored Pencils, Dies, Brads, Embossing Folders, Fibers/Ribbon

Wednesday, September 21, 2016

Use Your Washi!

This month the Tool/Stash Challenge on the Club Scrap forum is to use Washi Tape...  which I love and have tons of.  I must admit though that I don't use it as often as I could/should so today I want to share a card I made over the weekend using 3 of my many many rolls of washi tape.


I am so tickled with how well it turned out!  It didn't start out looking this good - I originally tried to "free-hand" tape placement and let me tell you it was a disaster.  My lines weren't even at all so I peeled off all the tape and decided to do it the right way.

My trick for getting straight washi tape lines....  I used my ScorPal cutting mat and it worked like a charm!


I tilted my card to the angle I wanted my stripes to be placed then took a long piece of the washi tape (the polka dot strip near the center) and placed it along one of the inch marks through the center of the card.  I then was able to use the lines on the mat to line up each of the following pieces of washi tape.  I used 1/8" marks on the close together lines and 3/8" for the larger spaces which I later stamped with text and image stamps from the Garden Shed kit.


After I had taped up the entire card panel I used my exacto knife to cut it free.  And that's how easy it is to get perfectly aligned stripes of washi tape.


I was so tickled with my "water" gems coming from the sprinkling can... 

Supplies:

Club Scrap - Garden Shed papers, stamps; Sunflowers Kit Washi Tape
Scor Pal Cutting Mat
Imagine - Memento Dye Ink
Washi Tape - Unknown (blue & polka dot)
Prima - Flowers

Monday, September 19, 2016

Scrapbook Sketch to Card


Each month a member of the Club Scrap design team offers up a challenge for everyone to try.  This month Donna challenged us all to take a sketch and flip it....  either a scrapbook sketch into a card or a card sketch into a scrapbook layout.  I thought it sounded like fun so I went in search of a scrapbook layout to turn into a card.  I happened upon this sketch that I thought looked like fun and it just so happened to fit in perfectly with this month's kit - Garden Shed...


And here is the card I came up with following the scrapbook lo sketch....


I stamped the background with the herb stamps (using VersaMark ink & Clear EP) included in the kit.  I then die-cut the honey comb paper using 2 different size hexagon dies from spellbinders.  The bee, snail and sentiment were all stamped then adhered to the card.  I added the flowers but it still looked a bit bare so I made some scratchy lines using a brown gel type pen.  Each of the flowers has a faux gemstone either in harvest yellow or clear.

It's not an exact replica and I used image stamps in the background instead of text but I like how it turned out.  Similar enough to show the inspiration but still mine in my own quirky way.

Have you ever tried to flip flop a sketch from scrapbook to card or visa versa?  How did yours turn out?

Supplies:

ClubScrap.com - Garden Shed Kit papers, stamps
Imagine - VersaMark Ink, Clear EP, Memento Dye Ink
Prima - Flowers
Foray Stylemark Pens

Thursday, September 15, 2016

Little Green Mermaid

I have a fun monochromatic project I made recently using Imagine inks and mediums....


I made this card using a few fun techniques - first off the lines were created by tearing bits of washi tape into thin strips for my wonky masked lines.  I then used a brayer to roll on the colors... if you haven't used your brayer recently you should really pull it out.  Sometimes I forget how much fun they really are to use. 

The top 4 color bars are from the Kaliedacolor ink pad - Fresh Greens.  I rolled on New Sprout Memento ink on the bottom of the card where my sentiment is stamped.

My pretty little mermaid (JFF Stamps) was stamped on white cardstock then colored using a variety of Memento Dual Tip Markers and inks (with a waterbrush).  There are little accent dots both on the card and on the mermaid that were made using Pico Embellishers in Wedding Dress (white) and Electric Green.

You can find complete instructions on the Imagine Blog - Mermaid Wishes.

Tuesday, September 13, 2016

Halloween is coming!

I decided to just take a few moments and make a card even though I didn't really have time for it.  

This cute little witch is one of the newest stamps released from Deep Red Stamps...


She is stamped with VersaFine black in and colored in with an assortment of colored pencils. 
The background papers are Authentiques (from last year) I believe.

Wednesday, September 7, 2016

I Need More Thyme....

Yes, I need more time...thyme...


It seems like all I have time for recently are a few stamped cards here and there. Our business has picked up so much in the last few months I have been working every day where in the past I had worked a couple days a week which gave me the rest of the time to create.  I never actually realized how much time I devoted to Ink Stains until I wasn't able to do so. Not that I'm complaining about the work, it's wonderful that our products are so highly regarded that we have increased our volume about 4x what it was just a year ago.  We are very blessed.  

I just feel like I'm letting you, my inky friends down.  I've had several people unsubscribe over the last few weeks - of course I don't know why.  There isn't any exit question I can ask so I'm just guessing.  I'm sure (in my mind) that it's in part due to the fact I've posted mostly just stamped cards in that time frame along with a few Design Team projects for various places. Experimenting with techniques, trial and error on projects, playing with various mediums, coming up with ideas even takes up so much time not to mention photographing, writing them up and sharing them.  It's overwhelming and sometimes I just can't get past that feeling to begin.

I am finally getting used to the hours so hopefully soon I'll to be able to get back to experimenting and sharing again.  Until then I want to thank those of you who've stuck with me...I appreciate it and hope to reach a semblance of "normal" soon!

The above card was made using Club Scraps - Garden Shed kit paired with Memento Inks and a few colored pencils.

Tuesday, September 6, 2016

Beeeee Happy!


Even though it feels like Monday - beeee happy cause it's really Tuesday!

Another challenge card - this time I am playing along with the card sketch week at Always Playing with Paper - Card Sketch #76.


As you can see I decided to turn this sketch on it's side and work in a landscape format instead of portrait.  I used the honey bee hive in place of the circle and a honeycomb print behind it.  Both the sentiment and bees were stamped with Rich Cocoa Memento Dye Ink.  The bees were then colored in with a Prisma Colored Pencil.  I inked all of the edges with the Rich Cocoa ink as well...it just looked better to me than leaving it plain.

Supplies:

ClubScrap.com - Garden Shed - stamps, papers
Imagine - Memento Dye Inks

Monday, September 5, 2016

Grow Kindness CTS #188

Happy Labor Day!
(to my friends here in the USA)

Happy Monday to everyone else.

It's nice to have an extra day off of work - well most of us do.  I decided to (in addition to watching the Cubs beat the Brewers) play in my art room for a nice change of pace!


I am working on a few projects for some DT commitments and while things are drying I wanted to work on a few challenges that seem to be filling my inbox lately.  Today I wanted to tackle the CAS(E) this Sketch! #188.


It matched the newest Club Scrap kit - Garden Shed that I rec'd in the mail on Saturday.  The kit included some cool wooden garden stakes which I thought looked exactly like the little tabs on the sketch.  Since I am going to be mailing it though I thought it would be cool to make the stakes from brown fun foam instead!  It was so quick and easy I actually ended up making several extras.  I grunged them up a bit with some Rich Cocoa and Tuxedo Black inks just to make them look "used".  

The collage image was also included in the kit and all I did was stamp it and color it with my pastel pencils.  Stamped the sentiment on one of the "wooden" stakes and assembled according to the sketch.  Easy peasy!   

This was a really fun sketch, I enjoyed playing along with it.

Supplies:

ClubScrap.com - Garden Shed  stamps, papers, fiber
Imagine - Memento Dye Ink - Rich Cocoa, Tuxedo Black, VersaFine Ink - Black
Stabilo - Pastel Pencils
Fun Foam

Friday, September 2, 2016

Happy Labor Day!

Time to kick back and enjoy a day off (for many of us) here in the States.  Today I have a fun shaker card to help kick off the celebration...


The stars (including the shaker star) were all made by layering several layers of die-cuts on top of eachother.  Some have just a couple layers while the shaker has several.  It's an easy way to add depth and dimension to any project!

Be sure to check out the Imagine blog for all of the details and supply list....

It's Party Time

Thursday, September 1, 2016

Club Scrap September Card Sketch Challenge

Happy September my Inky Friends!  

Gosh can you believe it's the start of September already?  This year just keeps flying by. As you know each month over on the Club Scrap forum we post a new card sketch to challenge your creativity.  This month Anne has created the sketch in both portrait and landscape forms to get you going...


The first sketch I took very literal and used a couple dainty little paper doilies I had in my stash.  I used stamps and paper from the Weathered Florals kit.  Can't remember which kit the sentiment is from.


My card for the landscape sketch is a loose interpretation of the sketch.  I used die-cut stitched frames for the background shapes that I inked with a bit of Rich Cocoa.  I then stamped the sentiment on a piece of vellum and added a few stamped & colored sunflowers for the accents.


Now it's your turn!

If you have some free time be sure to give these fun sketches a try...

Have a wonderfully inky day!